
How to Make a Clickable Slideshow Banner in Blogger

You might be wondering why I have a photo of milk and donuts instead of something technical looking when I’m talking about slideshows. Well, I’m currently obsessed with the Donut Showdown program on TV and can’t stop thinking about them.
Do you know how long I spent trying to figure out how to make a slider for my blog? Too long. Hours of Googling. Painful amounts of searching. Finally, I went back to basics and found a really simple way of doing it. I’ve written it down here because it really shouldn’t be so stressful, and because we’re on Blogger doesn’t mean we can’t look, er, un-Blogger-like.
Okay, first you need to make your banners. However many you like, but remember of course, the more you have, the slower your site will be (or so I hear). I made four or five – and the amazing thing about this simple way of doing things is that you can change your slideshow photos as often as you like.
So, figure out how wide your banners needs to be (the width of your blog) and make them to the size you need. If you’re unsure of how wide your blog is, go to your browser, click Develop, Show Web Inspector, and the information is in there.
Once you have the images you need (I made mine in Photoshop, but you can use PicMonkey if you don’t have that – I love PicMonkey), you need to host them somewhere. I use Photobucket. Upload them.
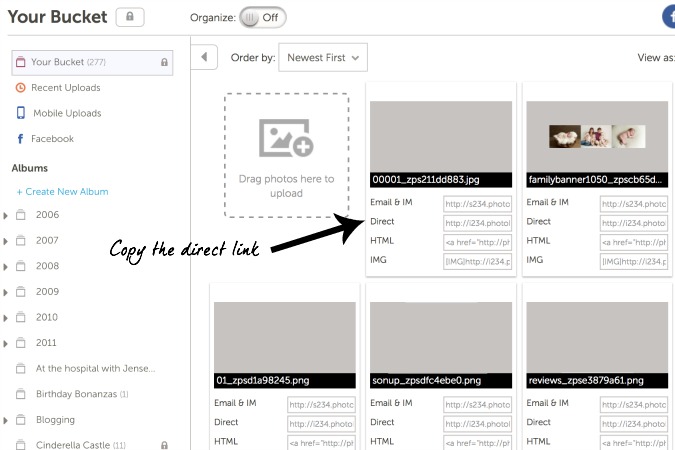
Once they’re uploaded, copy the DIRECT link to your image, as shown below.
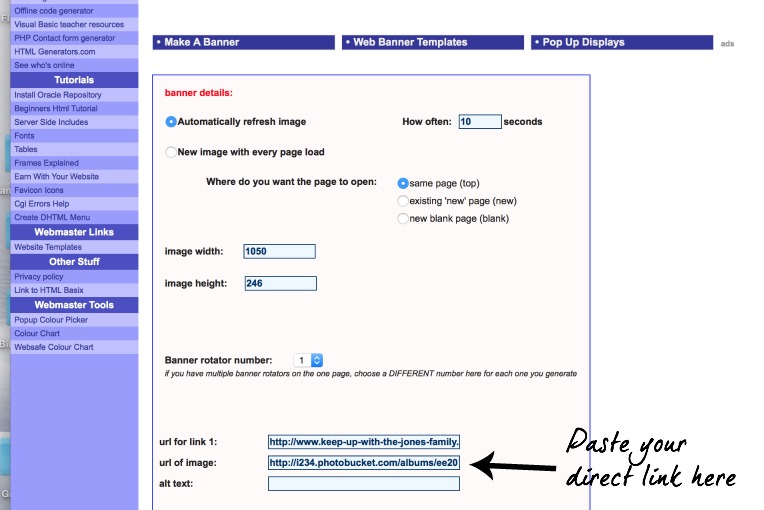
Now the fun part. Open a new window and go to the site HTML Basix. Input how often you’d like your banner to change images, and the dimensions of your banner. Then paste in your direct link as shown below. If you want people to be able to click your slideshow images, input the location that you’d like to link to in the box below each image.

Then click generate. The page will show coding similar to below:
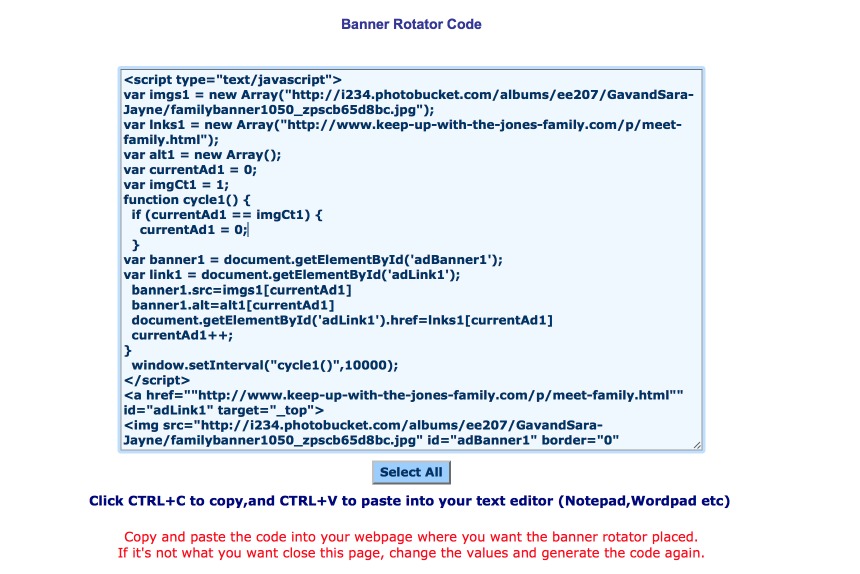
Copy the code, then head over to your blog. Click Add a Gadget and find the HTML gadget.
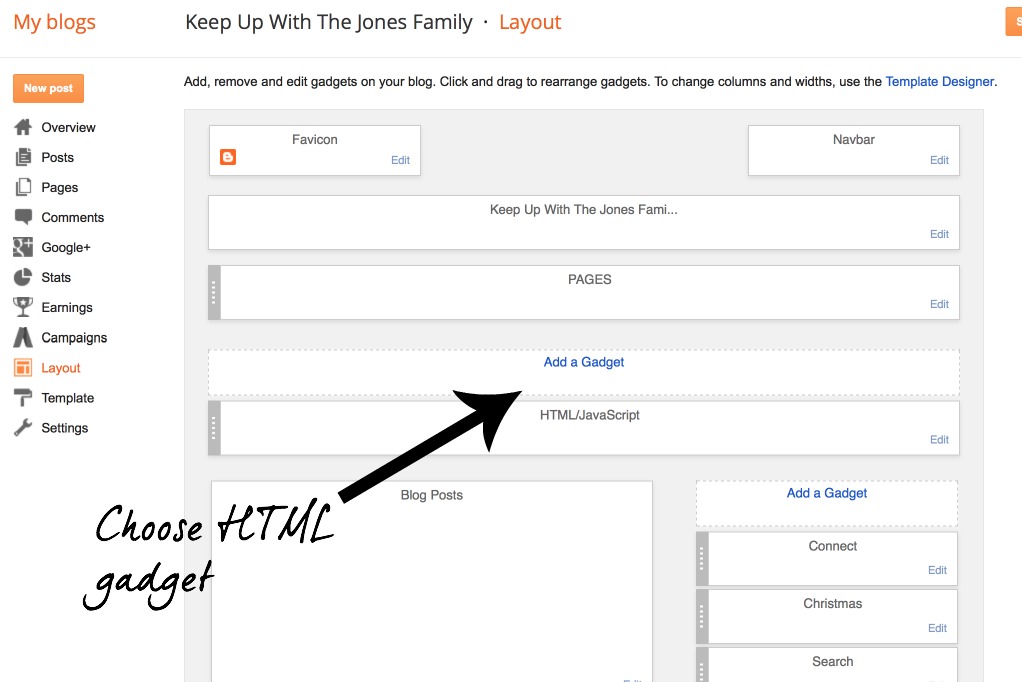
Paste in the code and save.

Move the gadget to the head of your blog layout click save arrangement.
That’s it! Simple. After all of those hours of stressing, and it’s really simple. I hope this can save someone a headache.

![PICTURE PERFECT [A WEEK ON INSTAGRAM]](https://keep-up-with-the-jones-family.com/wp-content/uploads/2016/06/PicturePerfectIGlastofjune.jpg)

This is so great. Thanks so much for showing how to do this. I am always so useless when it comes to the technical stuff and trying to improve my blog. It's always so much easier when I have a tutorial like this to copy for when I'm trying to create something.
Ooooh fancy! I have Blogger, too, and I'm always trying to find ways to make it work better and provide better content for my readers. I hate Googling stuff only to realize that no one's made a tutorial. :/ Pinning this!
I am not on blogger. I will say thank you for taking the time to share the knowledge of how-to-blogging. I can't tell you how many times I am looking for something everyone or quite a few have and not being able to find out how to do it. Thank you!!!!!!!!!!! Want to switch over to WordPress 🙂
This is a fun tutorial! I think I might try to make a banner myself. You have made it a whole lot simpler to figure out how to do this with your step-by-step guide.
I didn't even realize all of this cool stuff could be done in blogger. I don't use blogger but I do have one set up for commenting which links back to my main blog at Shabby Chic Boho. Now that I know it's got some nifty features, I might play around with mine a little more. Thanks so much for sharing.
This is really interesting. I haven't exactly thought of making clickable banner for my blog, but it could be worth a try. Love the layout of your website. It looks neat, concise and easy to navigate.
That's a lot of work for something so simple. You just need your basic html code, not all that script.
< a h r e f = " l i n k " > < i m g s r c = " i m a g e " > < / a >
simple enough, but one could go about this way, if they really wanted to.
This is a great tutorial! I have never done this sort of thing on my blog, but I want to now! It allows me to upload a lot of pictures to my blog without taking up a ton of room and making it cluttered. I am definitely going to pin this on my pinterest account because I need this tutorial haha! Thanks for the post!
OMGoodness…seeing all of that HTML just made my head spin. You gotta love the Internet though…every time I've ever needed HTML or assistance in coding something wonderful (or even the most basic thing), I just Google it, and eventually, I find a blog post written by someone who was once in my shoes. Thanks for sharing this, I never even thought about making a slideshow banner…very cool!
How cool! A slideshow would be beautiful, I just need to learn how to use it. The HTML does look scary but as long as it is just copy+paste for me, I'm good lol. The first picture is absolutely precious, they are so cute and look happy as well. Thank you for sharing this wonderful post, very inspiring for me to make one.